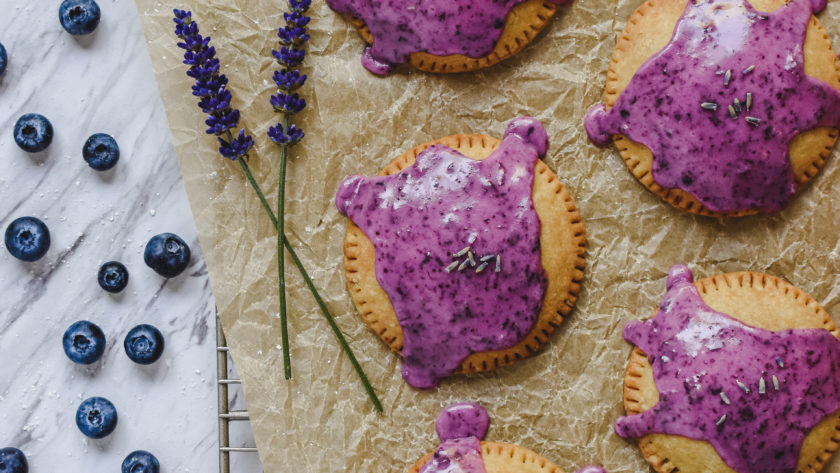
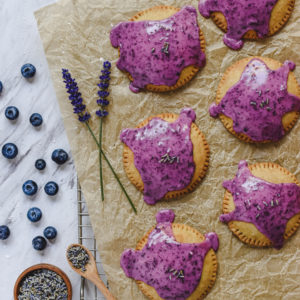
Lavender is the ultimate relaxing and hypnotic herb! The addition of their soft and delicate flavor is such a divine way to elevate your desserts, especially when added to these mini, hand-held pies. These pies are the perfect serving size, have the perfect amount of sweetness, the perfect amount of crust, and the perfect combination of flavors.

Inspiration
After making my Raspberry Rose Tart, I was truly inspired to start baking with more floral herbs. They add such a dainty and soft flavor, while almost creating an element of surprise in a dish. Using flowers is a truly fantastic way to upgrade a dessert and give it a grander sense of elegance.
Additionally, lavender inspires me because of its proven psychoactive and hypnotic effects on the nervous system and mind. Even the very smell of it has the magical power of promoting relaxation, mood stabilization, and calmness while decreasing levels of anxiety and stress. To learn more about lavender and its relationship with the human nervous system, click here.

How to make Lavender-Blueberry Mini Pies
With just 9 ingredients, you can have these deliciously tranquil pastries ready in no time. This recipe is:
Flakey
Sweet
Balanced
& Exciting to eat
Prepare the Crust
The first step to making these mini pies is to create the crust. For the crust, all you will need is flour, vegan butter, sugar, plant milk, and a dash of salt. Begin by sifting your flour and whisking it together with the sugar and salt. Next, scoop the chilled butter into the bowl one tablespoon at a time.
Once all the butter has been scooped in, use your hands to smash the butter balls and evenly incorporate them with the flour mixture. I find this part to be very satisfying, as the child within me loves getting a tad bit messy and using my hands! Make sure to do this rather quickly, though, as you want the butter to remain as cold as possible. Cold layers of butter = flakey crust. And the flakey crust is exactly what we’re going for when making pie dough. Once the butter is evenly incorporated, slowly pour in the cold milk, while continuing to mix with your hands. A rough dough ball should form, and although it may look slightly dry, refrain from adding additional hydration.

Move the dough ball to a floured surface, and shape it into a disk. Shaping it into a disk will make rolling it out much easier after it has had time to chill and harden. Wrap the disk in plastic wrap, and place it in the refrigerator to chill for at least 30 minutes. In the meantime, make the filling.
Make the filling
While the dough is chilling, begin preparing the filling. Simply enough, the filling consists of blueberries, dried lavender, sugar, cornstarch, and a dash of salt to even everything out. Start by adding the blueberries and sugar to a small saucepan on medium heat. Cook until the sugar dissolves and then mash the mixture into a liquid-like consistency with either a fork or potato masher.
As for the blueberries, feel free to use either fresh or frozen berries. Frozen berries will either need to be thawed until soft or simply placed in the saucepan for a longer period of time until they are soft enough to mash. I used frozen blueberries for this recipe, and it took about 5 minutes of them being in the saucepan for them to become soft enough to mash down into a liquid.

As the sugar dissolves, make the cornstarch slurry. This is made by combining 1 tablespoon of cornstarch with 1 tablespoon of water. Mix the two with a fork until the cornstarch dissolves, and then pour it into the saucepan with the blueberries. After doing this, immediately add the dried lavender to the saucepan, as well. You will notice that the mixture will begin to thicken. Continue to cook this mixture for about three more minutes, and then remove the pan from the heat to cool. As it cools, the filling will thicken even further.
Shape the dough
Once the dough has had sufficient time to chill, remove it from the refrigerator, discard the plastic wrap, and place the disk on a floured surface. Lightly flour the top of the disk and use your rolling pin to evenly roll out the dough until it is about 1/4th-1/8th of an inch thick. Now, using a circular-shaped cookie-cutter, the lid to a mason jar, or just the top of a cup, cut the dough into 24 circles. I personally don’t own a circular-shaped cookie cutter(yet), so I used the top of a mason jar and it worked out great!
If you don’t have enough space on the dough to cut 24 circles, form a ball out of the excess dough and roll it out again until it is the same thickness as the original dough you rolled out. Follow the same method you used before to cut the dough and create the remaining amount of circles needed, or until all the dough has been used up.

Using a fork, prick a couple of holes into half of the circles you cut out (if you made 24 circles, prick holes into 12 of them). The circles with holes in them will serve as the caps or tops to the pies, while the un-pricked circles will serve as the bottoms. These holes will act as ventilation for steam from the filling and dough to escape. If this step is skipped, there’s a good likelihood that pressure will build up inside the pie and create some unwanted blemishes on the pies.
Carefully transfer the pie bottoms to a baking sheet lined with parchment paper or a silicone baking mat. Depending on the size of your pan, and how closely you place the pies together, you might need to make two batches. I was only able to fit 8 pies on my baking sheet, so I had to bake the remaining 4 separately.
I love my silicone baking mat! It’s only $8, fits my baking sheet perfectly, is 100% non-stick, and makes cleanup so easy! I’ve had the same one for over three years now, and it hasn’t failed me once. I highly recommend picking one of these up! Especially if you like to cook oil-free, don’t want to constantly buy parchment paper, or don’t like the extra grease from using a nonstick spray.

Once you have all the dough circles ready to rock, and the filling has cooled and thickened, it’s time to construct the pies. Scoop about 2-3 teaspoons (or 1 tablespoon) worth of filling into the center of a pie bottom, being very careful that the filling does not run to the edges of the dough. Quickly place one of the pie caps (the circle with holes) on top, and immediately use your fingers to pinch the edges of the dough together. Take an extra step to seal the seam by pressing your fork into the perimeter of the pies. Repeat this filling and sealing process until all 12 pies have been created. Make sure to reserve at least 1 tablespoon of filling for the icing.
Once all the pies have been made, place them in the refrigerator to chill for at least 30 minutes before baking. While they chill, preheat the oven to 400°F

Once the pies have had enough time to chill, place them in the oven to bake for 25-30 minutes, until golden brown. To make sure they cook and brown evenly, flip the pan halfway through the baking process. I cooked all 12 pies at the same time, on two different sheets. To reach this color, it took me exactly 27 minutes, but your oven might be different, so make sure to keep an eye on them as they cook.
Once they have finished baking, transfer the pies to a wire rack to cool, as you prepare the icing.

Prepare the icing
In a small to medium-sized bowl, use a fork to combine all the icing ingredients, which consists of powdered sugar, the lavender-blueberry filling, plant milk, and more dried lavender. Drop about a tablespoon worth of icing in the center of the pies and allow gravity to do the rest of the work. At this time, feel free to sprinkle more dried lavender on top as additional garnish, and lightly press it into the icing to prevent it from falling off when the icing cools and hardens.

Storing & reheating
These mini pies can be stored in the refrigerator for up to a week, or in the freezer for up to three months. Once the icing has cooled, it is okay to stack the pies to store them as the icing will harden and stay in place, but do be mindful of gentleness when handling these.
To reheat, place in an air fryer for about 5 minutes at 350°F, or in a regular oven for 10-15 minutes at 350°F. Keep an eye on them as they reheat to prevent the icing from burning or completely melting off. Additionally, if you have a microwave, reheat for about 10 seconds until just warm.
The pies themselves can be made in advance and stored without frosting, as this will provide more leniency with reheating and gives you the option to apply fresh icing when the opportunity is right – kind of like a pop tart, or toaster strudel!
If you liked this recipe, you might also enjoy my Raspberry Rose Tart!
And if you ended up making this recipe, I’d love to see your beautiful, mini creations!
💜 M
Vegan Lavender-Blueberry Mini Pie
Ingredients
Crust Ingredients
- 2½ cups flour
- 1 cup butter
- ½ cup plant milk
- 1 tbsp sugar
- 1 tsp salt
Filling Ingredients
- 2 cups blueberries (frozen or fresh)
- ¼ cup sugar
- 1 tsp dried lavender
- 1 tbsp cornstarch (dissolved in 1 tbsp water)
- dash of salt
Icing Ingredients
- 1 cup powdered sugar
- 1 tbsp lavender-blueberry filling
- 1 tbsp plant milk
- ¼ tsp dried lavender
Instructions
Prep the crust
- In a medium sized bowl, whisk together the sifted flour, salt and sugar.
- Add the cold butter to the bowl of flour mixture one tbsp at a time.
- Use your hands to combine the butter and flour mixture.
- Slowly add in the milk, still using your hands to combine the ingredients.
- Shape the dough into a disk, cover with plastic wrap and place in the refrigerator to chill for at least a half hour.
Make the filling
- Place the blueberries and sugar in a medium-sized sauce pan over medium heat.
- Use a potato masher or fork to mash the mixture into a somewhat liquid-like consistency.
- Using a fork, combine 1 tbsp cornstarch with 1 tbsp water in a small cup until it forms a slurry.
- Add the cornstarch sturry, as well as the dried lavender and salt to the mashed blueberries.
- Cook for about 3 more minutes, then remove the pot from the heat and set aside to cool.
Shape the dough
- Remove the dough from the refrigerator and place on a floured surface.
- Roll out the dough until it is about ¼-⅛ of an inch thick.
- Using a circular shaped cookie cutter or top of a mason jar, cut the dough into 24 circles.
- Prick your fork a couple times into only 12 circles. These circles will be the tops of the pies.
- Place the remaining 12 circles onto a baking pan lined with parchment paper or a silicone mat. These circles will be the bottoms of the pies. You may have to do this in 2 batches depending on the size of your pan.
- Fill each pie bottom(the ones without the fork pricks) with 2-3 tsp of the filling. Carefully and quickly place a pie top over it and pinch the edges together with your fingers.
- Close the seam further by pressing your fork into the perimeter of the pie.
- Repeat the filling and sealing process until all 12 pies have been created.
- Chill the dough for at least 30 minutes.
- Preheat the oven to 400°F
- Bake for 25-30 minutes, making sure to flip the pan halfway through.
- Remove when they are golden brown, and place on a cooling rack lined with parchment paper.
Prepare Icing
- Mix all of the icing ingredients together in a small bowl.
- Pour ontop of the pies after they have cooled down slightly.
- Sprinkle more dried lavender on top if you'd like.
- Enjoy!